
To download the book click here
Software testing (Manual and
Automation)- Written by Sabiul Islam-sabiul.islam@uiu.cse.ac.bd.com
(Instruct of CDIP -United International
University )
Index:
ISTQB[International Software
Testing Qualifications Board] syllabus
Introduction of software testing
Importance of Software Quality
Assurance
Software Development Life Cycle (SDLC)
Software Development Life Cycle (SDLC)
Waterfall and Agile Management
Software Testing Life Cycle (STLC)
Software Testing Life Cycle (STLC)
What is Software
What is Testing
What is SQA
What to test?
Why to test
How to test
Testing Fundamentals
Software Testing Principles
Suspend Criteria & Exit Criteria
Test Planning
Test Scenarios
Test Case Preparation
Test Scenarios
Test Case Preparation
Boundary value analysis and equivalent
partitioning.
System Testing
Retesting & Regression Testing
Smoke Testing and Sanity Testing
Verification vs Validation
Agile Testing
Acceptance Testing
Test Report
Bug Life Cycle
Bug Life Cycle
Bug Priority & Severity
Bug Reports
Bug Reports
Bug Management Tools
Bug Leakage and Bug Release
Types of Testing
Functional Testing
Non-Functional Testing
Testing Methodology
Unit Testin0067
Black Box Testing
White Box Testing
Grey Box
testing
GUI Testing
Alpha and beta testing
Risks and Testing
Definition of Risk
Product and Project Risks
Risk-based Testing and Product
Quality
Defect Management
Decision Table Testing
State Transition Diagram & Use Case
Testing
Testing Review
Checklist-based Testing
Test Management & Control(Agile
Testing)
Estimation
Test Plan
Defects
Defect Life Cycle
Requirements Module
Test Plan Module
How to Create Test Data
Test Case Design
**Doing a sample project about create
Different Test case, Test scenario, Test plan
*** Interview question
Security testing
OWASP top 10 security risks.
The OWASP Top 10 list consists of the
10 most seen application vulnerabilities:
Injection (SQl)
Using Components with known
vulnerabilities
Insufficient logging and monitoring
Penetration Testing
What is Penetration Testing
Why Penetration Testing?
Types of Penetration Testing:
How to do Penetration Testing
Examples of Penetration Testing Tools
Tools: How to use burp suite and Nessus, Metasploit ,
Acunetix
*** Interview question
Performance testing
*** Interview question
Database testing
Make a Test report Using Workbench or
Toad tools test oracle or MySQL database testing
*** Interview question
Api testing
What is API Testing
Make a Test report of API testing using Postman
*** Interview question
Postman
*** Interview question
Functestional testing unite
testing
*** Interview question
Mobile Apps Testing: Sample Test Cases &
Test Scenarios
*** Interview question
Automation testing
Web application automation testing
using selenium
Mobile application automation testing
using appium
Api
automation testing using rest assured framework
Introduction to Selenium
Install IDE
Introduction IDE Intelij
Creating your First Selenium
script
How to use Locators in Selenium
How to enhance a script using Selenium
Web Driver
Introduction to WebDriver & Comparison
with Selenium RC
Guide to install Selenium WebDriverCreating your First Script in Webdriver
Accessing Forms in Webdriver
Accessing Links & Tables using Selenium Webdriver
Keyboard Mouse Events , Uploading Files – Webdriver
How TestNG makes
Selenium tests easier
Introduction to Selenium Grid
Parameterization using XML and DataProviders: Selenium
Cross Browser Testing using Selenium
All About Excel in Selenium: POI & JXL
Creating Keyword & Hybrid Frameworks with
Selenium
Page Object Model (POM) & Page Factory in
Selenium: Ultimate Guide
PDF , Emails and Screenshot of Test Reports
in Selenium
Using Contains, Sibling, Ancestor to Find
Element in Selenium
Selenium Core Extensions
Sessions, Parallel run and Dependency in
Selenium
Handling Date Time Picker using Selenium
Log4j and LogExpert with
Selenium
Selenium with HTMLUnit Driver & PhantomJS
Database Testing using Selenium: Step by Step
Guide
Test Case Priority in TestNG
TestNG: Execute multiple test suites
Handling Cookies in Selenium WebDriver
Alert & Popup handling in Selenium
XPath in Selenium: Complete Guide
Handling Ajax call in Selenium Webdriver
Listeners and their use in Selenium WebDriver
Firefox Profile - Selenium WebDriver
Breakpoints and Startpoints in Selenium
**Finally will create a Web automation project
using selenium
*** Interview question
Api
automation testing using rest assured framework java
REST Assured Maven Dependencies
Testing with REST Assured Example
JSON Root Data Validation
Check if JSON Key Has a Value
Check If JSON Array has a Value
Testing Floats and Doubles with REST
Assured
Explicitly Specifying Request Method
REST Assured BaseURI
Logging Request Details
*** Interview question with a project
Mobile application automation testing
using appium
*** Interview question with a project
Manual testing:
Software testing is
nothing but an art of investigating software to ensure that its quality under
test is in line with the requirement of the client. Software testing is carried
out in a systematic manner with the intent of finding defects in a system. It
is required for evaluating the system. As the technology is advancing we see that
everything is getting digitized. You can access your bank online, you can shop
from the comfort of your home, and the options are endless. Have you ever
wondered what would happen if these systems turn out to be defective?One small
defect can cause a lot of financial loss. It is for this reason that software
testing is now emerging as a very powerful field in IT.
Importance of Software Quality Assurance:
Quality assurance is
the planned and systematic set of activities that ensures that software
processes and products conform to requirements, standards, and procedures.
Processes include all of the activities involved in designing, developing, enhancing, and maintaining software.
Products include the software, associated data, its documentation, and all supporting and reporting paperwork.
QA includes the process of assuring that standards and procedures are established and are followed throughout the software development lifecycle.
Standards are the established criteria to which the software products are compared.
Procedures are the established criteria to which the development and control processes are compared.
Compliance with established requirements, standards, and procedures is evaluated through process monitoring, product evaluation, audits, and testing.
The three mutually supportive activities involved in the software development lifecycle are management, engineering, and quality assurance.
Software management is the set of activities involved in planning, controlling, and directing the software project.
Software engineering is the set of activities that analyzes requirements, develops designs, writes code, and structures databases.
Quality Assurance ensures that the management and engineering efforts result in a product that meets all of its requirements.
Software Development Life Cycle (SDLC):
The software development life
cycle (SDLC) is a framework defining tasks performed at each step in the
software development process. SDLC is a structure followed by a development
team within the software organization. It consists of a detailed plan
describing how to develop, maintain and replace specific software. The life
cycle defines a methodology for improving the quality of software and the
overall development process.
The software development life
cycle is also known as the software development process.
Waterfall and Agile Management:
The waterfall method is
a traditional project management approach that uses sequential phases to
define, build, test, and release project deliverables. Each phase is completed
and approved before the team moves on to the next phase. The project can't move
backwards to previous phases.
Agile is an umbrella term covering several newer project
management approaches that use iterative work cycles, called sprints. Each
sprint uses 'mini-phases' to define, build, test, and release the project
deliverables.
You show the audience a visual
comparing the two methods, which shows how the waterfall method is a sequential
process while agile methods are iterative cycles from the beginning to the end
of the project.
Software Testing Life Cycle (STLC):
Software Testing Life
Cycle (STLC) is defined as a sequence of activities conducted to perform
Software Testing.
Contrary to popular
belief, Software Testing is not a just a single activity. It consists of a
series of activities carried out methodologically to help certify your software
product.
Below
are the phases of STLC:
- Requirement Analysis
- Test Planning
- Test case development
- Test Environment setup
- Test Execution
- Test Cycle closure
What is Software:
Software is a set of
instructions, data or programs used to
operate computers and execute
specific tasks. Opposite of hardware, which describes the
physical aspects of a computer, software is a generic term used to refer
to applications, scripts and programs that run on a device. Software can be
thought of as the variable part of a computer and hardware the invariable part.
What is Testing:
Software testing is
defined as an activity to check whether the actual results match the expected
results and to ensure that the software system is Defect free. It
involves execution of a software component or system component to evaluate one
or more properties of interest.
What is SQA:
Software quality
assurance (SQA) is a process that ensures that developed software meets and
complies with defined or standardized quality specifications. SQA is an ongoing
process within the software development life cycle (SDLC) that routinely checks
the developed software to ensure it meets desired quality measures.
What to test?
Why to test?
Software
Testing is necessary because we all make
mistakes. Some of those mistakes are unimportant, but some of them are
expensive or dangerous. We need to check everything and anything we produce because
things can always go wrong.
How to test?
All
these phases go through the process of software testing levels. There are
mainly four testing levels are:
- Unit Testing
- Integration Testing
- System Testing
- Acceptance Testing
Each of these testing
levels has a specific purpose. These testing level provide value to the
software development lifecycle.
A Unit is a smallest
testable portion of system or application which can be compiled, liked, loaded,
and executed. This kind of testing helps to test each module separately.
The aim is to test each
part of the software by separating it. It checks that component are fulfilling
functionalities or not. This kind of testing is performed by developers.
Integration
means combining. For Example, In this testing phase, different software modules
are combined and tested as a group to make sure that integrated system is ready
for system testing.
Integrating
testing checks the data flow from one module to other modules. This kind of
testing is performed by testers.
System
testing is performed on a complete, integrated system. It allows checking
system's compliance as per the requirements. It tests the overall interaction
of components. It involves load, performance, reliability and security testing.
System
testing most often the final test to verify that the system meets the
specification. It evaluates both functional and non-functional need for the
testing.
Acceptance
testing is a test conducted to find if the requirements of a specification or
contract are met as per its delivery. Acceptance testing is basically done by
the user or customer. However, other stockholders can be involved in this
process.
Other Types of Testing:
- Regression Testing
- Buddy Testing
- Alpha Testing
- Beta Testing
Testing Fundamentals:
Software Testing Principles:
Here are the 7 Principles:
1) Exhaustive testing is not possible
Yes! Exhaustive testing
is not possible. Instead, we need the optimal amount of testing based on the
risk assessment of the application.
And the million dollar
question is, how do you determine this risk?
To answer this let's do
an exercise
In your opinion, Which
operation is most likely to cause your Operating system to fail?
I am sure most of you
would have guessed, Opening 10 different application all at the same time.
So if you were testing
this Operating system, you would realize that defects are likely to be found in
multi-tasking activity and need to be tested thoroughly which brings us to our
next principle Defect Clustering
2) Defect Clustering
Defect Clustering which
states that a small number of modules contain most of the defects detected.
This is the application of the Pareto Principle to software testing:
approximately 80% of the problems are found in 20% of the modules.
By experience, you can
identify such risky modules. But this approach has its own problems
If the same tests are
repeated over and over again, eventually the same test cases will no longer
find new bugs.
3) Pesticide Paradox
Repetitive use of the
same pesticide mix to eradicate insects during farming will over time lead to
the insects developing resistance to the pesticide Thereby ineffective of
pesticides on insects. The same applies to software testing. If the same set of
repetitive tests are conducted, the method will be useless for discovering new
defects.
To overcome this, the
test cases need to be regularly reviewed & revised, adding new &
different test cases to help find more defects.
Testers cannot simply
depend on existing test techniques. He must look out continually to improve the
existing methods to make testing more effective. But even after all this sweat
& hard work in testing, you can never claim your product is bug-free. To
drive home this point, let's see this video of the public launch of Windows 98
You think a company
like MICROSOFT would not have tested their OS thoroughly & would risk their
reputation just to see their OS crashing during its public launch!
4) Testing shows a presence of defects
Hence, testing
principle states that - Testing talks about the presence of defects and don’t
talk about the absence of defects. i.e. Software Testing reduces the
probability of undiscovered defects remaining in the software but even if no
defects are found, it is not a proof of correctness.
But what if, you work
extra hard, taking all precautions & make your software product 99%
bug-free. And the software does not meet the needs & requirements of the
clients.
This leads us to our
next principle, which states that- Absence of Error.
5) Absence of Error - fallacy
It
is possible that software which is 99% bug-free is still unusable. This can be
the case if the system is tested thoroughly for the wrong requirement. Software
testing is not mere finding defects, but also to check that software addresses
the business needs. The absence of Error is a Fallacy i.e. Finding and fixing
defects does not help if the system build is unusable and does not fulfill the
user's needs & requirements.
To
solve this problem, the next principle of testing states that Early Testing
6) Early Testing
Early
Testing - Testing should start as early as possible in the Software Development
Life Cycle. So that any defects in the requirements or design phase are
captured in early stages. It is much cheaper to fix a Defect in the early
stages of testing. But how early one should start testing? It is recommended
that you start finding the bug the moment the requirements are defined. More on
this principle in a later training tutorial.
7) Testing is context dependent
Testing
is context dependent which basically means that the way you test an e-commerce
site will be different from the way you test a commercial off the shelf
application. All the developed software’s are not identical. You might use a
different approach, methodologies, techniques, and types of testing depending
upon the application type. For instance testing, any POS system at a retail
store will be different than testing an ATM machine.
Suspend Criteria & Exit Criteria
Suspension Criteria
If the suspension criteria are met during testing, the active test cycle will be suspended until the criteria are resolved. Example: If your team members report that there are 40% of test cases failed, you should suspend testing until the development team fixes all the failed cases.
If the suspension criteria are met during testing, the active test cycle will be suspended until the criteria are resolved. Example: If your team members report that there are 40% of test cases failed, you should suspend testing until the development team fixes all the failed cases.
Exit Criteria
It specifies the criteria that denote a successful completion of a test phase. The exit criteria are the targeted results of the test and are necessary before proceeding to the next phase of development. Example: 95% of all critical test cases must pass.Some methods of defining exit criteria are by specifying a targeted run rate and pass rate.
It specifies the criteria that denote a successful completion of a test phase. The exit criteria are the targeted results of the test and are necessary before proceeding to the next phase of development. Example: 95% of all critical test cases must pass.Some methods of defining exit criteria are by specifying a targeted run rate and pass rate.
·
Run rate is ratio
between number test cases executed/total test cases of test
specification. For example, the test specification has total 120 TCs, but the
tester only executed 100 TCs, So the run rate is 100/120 = 0.83 (83%)
·
Pass rate is ratio
between numbers test cases passed / test cases executed. For
example, in above 100 TCs executed, there’re 80 TCs that passed, so the pass
rate is 80/100 = 0.8 (80%)
This data can be
retrieved in Test Metric documents.
·
Run rate is mandatory to be 100% unless
a clear reason is given.
·
Pass rate is dependent on project scope,
but achieving high pass rate is a goal.
Test Planning:
A test plan is a
detailed document that outlines the test strategy, Testing objectives, resources (manpower, software, hardware)
required for testing, test schedule, Test Estimation and
test deliverables.
The test plan serves as
a blueprint to conduct software testing activities as a defined process which
is minutely monitored and controlled by the test manager.
Test Scenarios:
A Test
Scenario is defined as any functionality that can be tested. It is also
called Test Condition or Test Possibility. As a tester,
you may put yourself in the end user’s shoes and figure out the real-world
scenarios and use cases of the Application Under Test.
Test Case Preparation:
A Test
Case is defined as a set of actions executed to verify a particular feature or
functionality of the software application. A test case is an indispensable
component of the Software Testing LifeCycle that helps validate the AUT
(Application Under Test).
Let’s
create a Test Case for the scenario: Check Login Functionality

Step 1) A simple test case for the scenario would be
Test
Case #
|
Test
Case Description
|
1
|
Check
response when valid email and password is entered
|
Step 2) In order to execute the test case, you would need
Test Data. Adding it below
Test
Case #
|
Test
Case Description
|
Test
Data
|
1
|
Check
response when valid email and password is entered
|
Identifying test data
can be time-consuming and may sometimes require creating test data afresh. The
reason it needs to be documented.
Step 3) In order to execute a test case, a tester needs to
perform a specific set of actions on the AUT. This is documented as below:
Test
Case #
|
Test
Case Description
|
Test
Steps
|
Test
Data
|
1
|
Check
response when valid email and password is entered
|
1) Enter Email
Address
2) Enter Password
3) Click Sign in
|
Password:
lNf9^Oti7^2h
|
Many times the Test
Steps are not simple as above, hence they need documentation. Also, the author
of the test case may leave the organization or go on a vacation or is sick and
off duty or is very busy with other critical tasks. A recently hire may be
asked to execute the test case. Documented steps will help him and also
facilitate reviews by other stakeholders.
Step 4) The goal of test cases is to check behavior the AUT
for an expected result. This needs to be documented as below
Test
Case #
|
Test
Case Description
|
Test
Data
|
Expected
Result
|
1
|
Check
response when valid email and password is entered
|
Login
should be successful
|
During test execution
time, the tester will check expected results against actual results and assign
a pass or fail status
Test
Case #
|
Test
Case Description
|
Test
Data
|
Expected
Result
|
Actual
Result
|
Pass/Fail
|
1
|
Check
response when valid email and password is entered
|
Login
should be successful
|
Login
was successful
|
Pass
|
Step 5) That apart your test case -may have a field like,
Pre - Condition which specifies things that must in place before the test can
run. For our test case, a pre-condition would be to have a browser installed to
have access to the site under test. A test case may also include Post -
Conditions which specifies anything that applies after the test case completes.
For our test case, a postcondition would be time & date of login is stored
in the database.
Boundary value analysis and equivalent partitioning:
Boundary
testing is the process of testing between extreme ends or boundaries between
partitions of the input values.
- So these extreme ends like
Start- End, Lower- Upper, Maximum-Minimum, Just Inside-Just Outside values
are called boundary values and the testing is called "boundary
testing".
- The basic idea in boundary
value testing is to select input variable values at their:
- Minimum
- Just above the minimum
- A nominal value
- Just below the maximum
- Maximum

- In Boundary Testing,
Equivalence Class Partitioning plays a good role
- Boundary Testing comes after
the Equivalence Class Partitioning.
- It divides the input data of
software into different equivalence data classes.
- You can apply this technique, where there is a range in the input field.
System Testing:
System Testing is the testing of a complete and fully integrated software product. Usually, software is only one element of a larger computer-based system. Ultimately, software is interfaced with other software/hardware systems. System Testing is actually a series of different tests whose sole purpose is to exercise the full computer-based system.
System Testing is the testing of a complete and fully integrated software product. Usually, software is only one element of a larger computer-based system. Ultimately, software is interfaced with other software/hardware systems. System Testing is actually a series of different tests whose sole purpose is to exercise the full computer-based system.
Retesting & Regression Testing:
Re-Testing: After a defect is detected and fixed, the software should
be retested to confirm that the original defect has been successfully removed.
This is called Confirmation Testing or Re-Testing
Regression testing: Testing your software application when it undergoes
a code change to ensure that the new code has not affected other parts of the
software.
Smoke
Testing and Sanity Testing:
Smoke and Sanity
testing are the most misunderstood topics in Software Testing. There is an
enormous amount of literature on the subject, but most of them are confusing.
The following article makes an attempt to address the confusion.
The key differences
between Smoke and Sanity Testing can be learned with the help of the following
diagram -

What is Smoke Testing?
Smoke Testing is
a kind of Software Testing performed after software build to ascertain that the
critical functionalities of the program are working fine. It is executed
"before" any detailed functional or regression tests are executed on
the software build. The purpose is to reject a badly broken application so that
the QA team does not waste time installing and testing the software
application.
In Smoke Testing, the
test cases chose to cover the most important functionality or component of the
system. The objective is not to perform exhaustive testing, but to verify that
the critical functionalities of the system are working fine.
For Example, a typical smoke test would be - Verify that the application launches successfully, Check that the GUI is responsive ... etc.
For Example, a typical smoke test would be - Verify that the application launches successfully, Check that the GUI is responsive ... etc.
What is Sanity Testing?
Sanity testing is a
kind of Software Testing performed after receiving a software build, with minor
changes in code, or functionality, to ascertain that the bugs have been fixed
and no further issues are introduced due to these changes. The goal is to
determine that the proposed functionality works roughly as expected. If sanity
test fails, the build is rejected to save the time and costs involved in a more
rigorous testing.
The objective is
"not" to verify thoroughly the new functionality but to determine
that the developer has applied some rationality (sanity) while producing the
software. For instance, if your scientific calculator gives the result of 2 + 2
=5! Then, there is no point testing the advanced functionalities like sin 30 +
cos 50.
Verification vs Validation:
Verification vs Validation:
Verification
|
Validation
|
1. Verification is a static practice of verifying
documents, design, code and program.
|
1. Validation is
a dynamic mechanism of validating and testing the actual product.
|
2. It does not involve executing the code.
|
2. It always
involves executing the code.
|
3. It is human based checking of documents and
files.
|
3. It is computer based execution of program.
|
4. Verification uses methods like inspections,
reviews, walkthroughs, and Desk-checking etc.
|
4. Validation uses methods like black box (functional) testing,
gray box testing, and white box (structural) testing etc.
|
5. Verification is
to check whether the software conforms to specifications.
|
5. Validation is
to check whether software meets the customer expectations and requirements.
|
6. It can catch errors that validation cannot
catch. It is low level exercise.
|
6. It can catch
errors that verification cannot catch. It is High Level Exercise.
|
7. Target is
requirements specification, application and software architecture, high
level, complete design, and database design etc.
|
7. Target is actual product-a unit, a module, a
bent of integrated modules, and effective final product.
|
8. Verification is
done by QA team to ensure that the software is as per the specifications in
the SRS document.
|
8. Validation is
carried out with the involvement of testing team.
|
9. It generally
comes first-done before validation.
|
9. It generally follows after verification.
|
Agile Testing:
Unlike the WaterFall
method, Agile Testing can begin at the start of the project with continuous
integration between development and testing. Agile Testing is not sequential
(in the sense it's executed only after coding phase) but continuous.
An agile team works as
a single team towards a common objective of achieving Quality. Agile Testing
has shorter time frames called iterations (say from 1 to 4 weeks). This
methodology is also called release, or delivery driven approach since it gives
a better prediction on the workable products in short duration of time.
Acceptance Testing:
ACCEPTANCE
TESTING is a
level of software testing where a system is tested for acceptability. The
purpose of this test is to evaluate the system’s compliance with the business
requirements and assess whether it is acceptable for delivery.
Test Report:
Test Report is a
document which contains
- A summary of
test activities and final test results
- An assessment of
how well the Testing is
performed
Based on the test
report, the stakeholders can
- Evaluate the quality of
the tested product
- Make
a decision on the software release. For
example, if the test report informs that there’re many defects remaining
in the product, the stakeholder can delay the release until all the
defects are fixed.
Bug
Life Cycle:
Defect Life Cycle or
Bug Life Cycle is the specific set of states that a Bug goes through from
discovery to defect fixation.
Bug Life Cycle Status
The number of states
that a defect goes through varies from project to project. Below lifecycle
diagram, covers all possible states
- New: When
a new defect is logged and posted for the first time. It is assigned a
status as NEW.
- Assigned: Once
the bug is posted by the tester, the lead of the tester approves the bug
and assigns the bug to the developer team
- Open: The
developer starts analyzing and works on the defect fix
- Fixed: When a
developer makes a necessary code change and verifies the change, he or she
can make bug status as "Fixed."
- Pending retest: Once the
defect is fixed the developer gives a particular code for retesting the
code to the tester. Since the software testing remains pending from the
testers end, the status assigned is "pending request."
- Retest: Tester
does the retesting of the code at this stage to check whether the defect
is fixed by the developer or not and changes the status to
"Re-test."

- Verified: The
tester re-tests the bug after it got fixed by the developer. If there is
no bug detected in the software, then the bug is fixed and the status
assigned is "verified."
- Reopen: If the
bug persists even after the developer has fixed the bug, the tester
changes the status to "reopened". Once again the bug goes
through the life cycle.
- Closed: If the
bug is no longer exists then tester assigns the status
"Closed."
- Duplicate: If the
defect is repeated twice or the defect corresponds to the same concept of
the bug, the status is changed to "duplicate."
- Rejected: If the
developer feels the defect is not a genuine defect then it changes the
defect to "rejected."
- Deferred: If the
present bug is not of a prime priority and if it is expected to get fixed
in the next release, then status "Deferred" is assigned to such
bugs
- Not a bug:If it does
not affect the functionality of the application then the status assigned
to a bug is "Not a bug".
Bug
Priority & Severity:

·
Both Severity and Priority are attributes of a
defect and should be provided in the bug report. This information is used to
determine how quickly a bug should be fixed.
·
Severity of a defect is related to how severe a
bug is. Usually the severity is defined in terms of financial loss, damage to
environment, company’s reputation and loss of life.
·
Priority of a defect is related to how quickly a
bug should be fixed and deployed to live servers. When a defect is of high
severity, most likely it will also have a high priority. Likewise, a low
severity defect will normally have a low priority as well.
·
Although it is recommended to provide both
Severity and Priority when submitting a defect report, many companies will use
just one, normally priority.
·
In the bug report, Severity and Priority are
normally filled in by the person writing the bug report, but should be reviewed
by the whole team.
·
Bug Reports:
·
Below sample bug/defect report will
give you an exact idea of how
to report a bug in the bug tracking tool.
·
Here
is the example scenario that caused a bug:
·
Once you enter all
this information, you need to click on the ‘SAVE’ button in order to save the
user. Now you can see a success message saying, “New User has been created
successfully”.
·
But when you entered
into your application by logging in and navigated to USERS menu > New user,
entered all the required information to create the new user and clicked on SAVE
button.
·
BANG! The
application crashed and you got one error page on the screen. (Capture this
error message window and save as a Microsoft paint file)
·
Now, this is
the bug scenario and you would like to report this as a BUG in your
bug-tracking tool.
·
How will you report this bug effectively?
·
Here
is the sample bug report for above-mentioned example:
(Note that some ‘bug report' fields might differ depending on your bug tracking system)
(Note that some ‘bug report' fields might differ depending on your bug tracking system)
·
SAMPLE BUG REPORT
·
Bug Name: Application crash on clicking the SAVE button while
creating a new user.
Bug ID: (It will be automatically created by the BUG Tracking tool once you save this bug)
Area Path: USERS menu > New Users
Build Number: Version Number 5.0.1
Severity: HIGH (High/Medium/Low) or 1
Priority: HIGH (High/Medium/Low) or 1
Assigned to: Developer-X
Reported By: Your Name
Reported On: Date
Reason: Defect
Status: New/Open/Active (Depends on the Tool you are using)
Environment: Windows 2003/SQL Server 2005
·
Description:
Application crash on clicking the SAVE button while creating a new
the user, hence unable to create a new user in the application.
Application crash on clicking the SAVE button while creating a new
the user, hence unable to create a new user in the application.
·
Steps To Reproduce:
1) Login into the application
2) Navigate to the Users Menu > New User
3) Filled all the user information fields
4) Clicked on the ‘Save' button
5) Seen an error page “ORA1090 Exception: Insert values Error…”
6) See the attached logs for more information (Attach more logs related to bug..IF any)
7) And also see the attached screenshot of the error page.
·
Expected result: On clicking SAVE button, should be prompted to a
success message “New User has been created successfully”.
·
(Attach ‘application
crash' screenshot. IF any)
·
Save the defect/bug in the BUG TRACKING TOOL. You
will get a bug id, which you can use for further bug reference.
Default ‘New bug’ mail will go to the respective developer and the default module owner (Team leader or manager) for further action.
Bug Management Tools:
Default ‘New bug’ mail will go to the respective developer and the default module owner (Team leader or manager) for further action.
Bug Management Tools:
You can put this in
another way "Better is the bug tracking tool, better the quality of the
product". Here is the list of top bug tracking tool in software industries
are
1) BackLog

Backlog is a
popular bug and project tracking tool in one platform. It’s easy for anyone to
report bugs and keep track of a full history of issue updates and status
changes. Development teams use Backlog to work with other teams for enhanced
team collaboration and high-quality project delivery.
- Easy
bug tracking tool
- Search
and advanced search features
- Full
history of issue updates and status changes
- Project
and issues with subtasks
- Git
and SVN built-in
- Gantt
Charts and Burndown charts
- Wikis
and Watchlists
- Native
mobile apps
2) ReQtest

ReQtest is a
cloud-based bug tracking tool with the easiest way to handle bug. It helps to
capture, track & manage bugs and issues. The tool allows you to preview bug
reports without any clicks. ReQtest allows seamless integration with JIRA to
handle bugs in JIRA or ReQtest or both.
- Preview
bug reports without any clicks
- Charts
for visual presentation of bug reports
- Built-in
filters to quickly find specific bug reports
- Drag
& drop any column to get a grouped view of your bug reports
- Single-page-view
of bug reports without any long scrolls
- Visualize
large amounts of data in bar or pie chart in a single click
- Create
powerful reports by export the charts to Word, Powerpoint, etc.
3) BugZilla

BugZilla is a popular
bug tracking tool. These tool is an open source software and provides some
great features like
- E-mail
notification for change in code
- Reports
and Charts
- Patch
Viewers
- List
of bugs can be generated in different formats
- Schedule
daily, monthly and weekly reports
- Detect
duplicate bug automatically
- Setting
bug priorities by involving customers
- Predict
the time a bug may get fixed
4) JIRA

5) Mantis

If you have used other
bug tracking tool, this tool can be easy to use. Mantis not only comes as a web
application but also has its own mobile version. It works with multiple
databases like MySQL, PostgreSQL, MS SQL and integrated with applications like chat, time
tracking, wiki, RSS feeds and many more.
Mantis main features
include
- Open
source tool
- E-mail
notification
- Supported
reporting with reports and graphs
- Source
control integration
- Supports
custom fields
- Supports
time tracking management
- Multiple
projects per instance
- Enable
to watch the issue change history and roadmap
- Supports
unlimited number of users, issues, and projects
Functional
Testing:
FUNCTIONAL TESTING is a type of software testing whereby the system is
tested against the functional requirements/specifications.
Functions (or features) are
tested by feeding them input and examining the output. Functional testing
ensures that the requirements are properly satisfied by the application. This
type of testing is not concerned with how processing occurs, but rather, with
the results of processing. It simulates actual system usage but does not make
any system structure assumptions.
During functional testing, Black Box Testing technique
is used in which the internal logic of the system being tested is not known to
the tester.
Functional testing is normally
performed during the levels of System Testing and Acceptance Testing.
Typically, functional testing
involves the following steps:
- Identify
functions that the software is expected to perform.
- Create
input data based on the function’s specifications.
- Determine
the output based on the function’s specifications.
- Execute
the test
case.
- Compare
the actual and expected outputs.
Functional testing is more
effective when the test conditions are created directly from user/business
requirements. When test conditions are created from the system documentation
(system requirements/ design documents), the defects in that documentation will
not be detected through testing and this may be the cause of end-users’ wrath
when they finally use the software.
Non-Functional Testing:
Non-functional testing
is defined as a type of Software testing to check non-functional aspects
(performance, usability, reliability, etc) of a software application. It is
designed to test the readiness of a system as per nonfunctional parameters
which are never addressed by functional testing.
An excellent example of
non-functional test would be to check how many people can simultaneously login
into a software.
Non-functional testing
is equally important as functional testing and affects client satisfaction.
Testing Methodology:
software
Testing Methodology is defined as strategies and testing types used to certify
that the Application Under Test meets client expectations. Test Methodologies
include functional and non-functional testing to validate the AUT. Examples of
Testing Methodologies are Unit Testing, Integration Testing, System Testing, Performance Testing etc. Each testing methodology has a defined test
objective, test strategy, and deliverables.
Unit Testin0067:
Black Box Testing:
BLACK BOX TESTING, also known as Behavioral Testing, is a software testing method in which the internal structure/design/implementation of the
item being tested is not known to the tester. These tests can be functional or
non-functional, though usually functional.
This method is named so because
the software program, in the eyes of the tester, is like a black box; inside
which one cannot see. This method attempts to find errors in the following
categories:
- Incorrect
or missing functions
- Interface
errors
- Errors
in data structures or external database access
- Behavior
or performance errors
- Initialization
and termination errors

White Box Testing:
WHITE BOX TESTING (also known as Clear Box Testing, Open Box Testing, Glass
Box Testing, Transparent Box Testing, Code-Based Testing or Structural Testing)
is a software testing method in which the internal structure/design/implementation of the
item being tested is known to the tester. The tester chooses inputs to exercise
paths through the code and determines the appropriate outputs. Programming
know-how and the implementation knowledge is essential. White box testing is
testing beyond the user interface and into the nitty-gritty of a system.
This method is named so because
the software program, in the eyes of the tester, is like a white/transparent
box; inside which one clearly sees.
Grey Box testing :
Gray Box Testing is a
technique to test the software product or application with partial knowledge of
the internal workings of an application.
In this process,
context-specific errors that are related to web systems are commonly
identified. It will increase the testing coverage by concentrating on all of
the layers of any complex system.
Gray Box Testing is a
software testing method, which is a combination of both White Box
Testing and Black Box Testing
method.
GUI Testing:
GUI
testing is defined as the process of testing the system's Graphical User
Interface of the Application Under Test. GUI testing involves checking the
screens with the controls like menus, buttons, icons, and all types of bars -
toolbar, menu bar, dialog boxes, and windows, etc.
Alpha and beta testing:
Alpha testing is a type
of acceptance testing; performed to identify all possible issues/bugs before
releasing the product to everyday users or the public. The focus of this
testing is to simulate real users by using a black box and white box
techniques. The aim is to carry out the tasks that a typical user might
perform. Alpha testing is carried out in a lab environment and usually, the
testers are internal employees of the organization. To put it as simple as
possible, this kind of testing is called alpha only because it is done early
on, near the end of the development of the software, and before beta testing.
Beta Testing of a
product is performed by "real users" of the software application in a
"real environment" and can be considered as a form of external User Acceptance Testing.
Beta version of
the software is released to a limited number of end-users of the product to
obtain feedback on the product quality. Beta testing reduces product failure
risks and provides increased quality of the product through customer
validation.
It is the final test
before shipping a product to the customers. Direct feedback from customers is a
major advantage of Beta Testing. This testing helps to tests the product in
customer's environment.
Risks
and Testing :
Risk based testing is
prioritizing the feature's, modules and functions of the Application Under Test
based on impact and likelihood of failures. It involves assessing the risk
based on the complexity, business criticality, usage frequency, visible areas, Defect prone
areas, etc.
Risk is the occurrence
of an uncertain event with a positive or negative effect on the measurable
success criteria of a project. It could be events that have occurred in the
past or current events or something that could happen in the future. These
uncertain events can have an impact on the cost, business, technical and
quality targets of a project.
Risks
can be positive or negative.
- Positive risks are
referred to as opportunities and help in business sustainability. For
example investing in a New project, Changing business processes,
Developing new products.
- Negative Risks are
referred to as threats and recommendations to minimize or eliminate them
must be implemented for project success.
Definition of Risk:
“Risk
is future uncertain events with a probability of occurrence and a potential for
loss”
Risk identification and
management are the main concerns in every software project. Effective analysis
of software risks will help to effective planning and assignments of work.
Product and Project Risks:
Product risk is the risk associated with the software or
system, the possibility that software or system may fail to satisfy end
user/customers expectations is known as product risk.
There may be the possibility that the software or system
does not have the functionality specified by the customer or the stakeholders
which leads to unsatisfactory software.
As we know that testing is an activity
and so it is subject to risk which may endanger the project, so we can say that
the risks associated with the testing activity which can endanger the test
project cycle is known as project risk.
In order to deal with project risks we
need to apply concepts like identifying, prioritizing and managing the project
risks.
Some of the risks associated with
project are:
- Delay in the test build to test team.
- Unavailability of test environment.
- Delay in fixing test environment due to lack of
system admin.
- Delay in fixing defects by development team.
- Organizational problems which can be like
shortage of staff. Required skills etc.
- Major changes in the SRS which invalidates the
test cases and requires changes in the test case.
Risk-based Testing and Product
Quality :
Risk
based testing is basically a testing done for the project based on risks. Risk based testing uses risk to
prioritize and emphasize the appropriate tests during test execution. In simple
terms – Risk is the probability of occurrence of an undesirable outcome. This
outcome is also associated with an impact. Since there might not be sufficient
time to test all functionality, Risk based testing involves testing the
functionality which has the highest impact and probability of failure.
The collection
of features and characteristics of a product that contribute to its ability to
meet given requirements. It’s the ability of the product to fulfil and meet the
requirements of the end user.
For a product to be of good quality it
should be reliable and perform all its functions smoothly.
Techniques for improving product quality:
-
·
Process control
·
Product control
·
Six sigma
·
Quality control
·
Total quality maintenance
Defect Management:
Generally,
defect management can be defined as a process of detecting bugs and fixing
them. It is necessary to say that bugs occur constantly in the process of
software development. They are a part of the software industry. That is because
of the fact that software development is quite a complex process. The team
members are usually placed in strict time frames. They must write large pieces
of code every day, and they usually don’t have time to think about how to avoid
bugs. Hence, every software development project requires a process that helps
detect defects and fix them.
The process of
defect management, or bug tracking, is usually conducted at the stage of
product testing. Without realizing this it would be hard to understand is the
nature of defect management. Software testing can be conducted in two different
ways. Usually, the developers test their product themselves. However, there is
also a type of testing that is based on user involvement. The final users are
often provided with an ability to report on the bugs they found. Nevertheless,
this is not the best way of testing, because the users could hardly find all
bugs.
Decision Table
Testing:
Decision table testing is a software testing technique
used to test system behavior for different input combinations. This is a
systematic approach where the different input combinations and their
corresponding system behavior (Output) are captured in a tabular form. That is
why it is also called as a Cause-Effect table where Cause and
effects are captured for better test coverage.
A Decision Table is a tabular representation of inputs
versus rules/cases/test conditions. Let's learn with an example.
Example 1: How to make
Decision Base Table for Login Screen
Let's create a decision table for a login screen.

The condition is simple if the user provides correct
username and password the user will be redirected to the homepage. If any of
the input is wrong, an error message will be displayed.
Conditions
|
Rule 1
|
Rule 2
|
Rule 3
|
Rule 4
|
Username (T/F)
|
F
|
T
|
F
|
T
|
Password (T/F)
|
F
|
F
|
T
|
T
|
Output (E/H)
|
E
|
E
|
E
|
H
|
Legend:
- T –
Correct username/password
- F –
Wrong username/password
- E –
Error message is displayed
- H –
Home screen is displayed
Interpretation:
- Case 1
– Username and password both were wrong. The user is shown an error
message.
- Case 2
– Username was correct, but the password was wrong. The user is shown an
error message.
- Case 3
– Username was wrong, but the password was correct. The user is shown an
error message.
- Case 4
– Username and password both were correct, and the user navigated to
homepage
While converting this to test case, we can create 2
scenarios ,
- Enter
correct username and correct password and click on login, and the expected
result will be the user should be navigated to homepage
And one from the below scenario


- Enter
wrong username and wrong password and click on login, and the expected
result will be the user should get an error message
- Enter
correct username and wrong password and click on login, and the expected
result will be the user should get an error message
- Enter
wrong username and correct password and click on login, and the expected
result will be the user should get an error message
As they essentially test the same rule.
State Transition Diagram & Use Case
Testing:
State Transition
testing is defined as the software testing technique in which changes in input
conditions cause's state changes in the Application under Test (AUT).
It is a black box
testing technique in which the tester analyzes the behavior of an application
under test for different input conditions in a sequence. In this technique,
tester provides both positive and negative input test values and record the
system behavior.
It is the model on
which the system and the tests are based. Any system where you get a different
output for the same input, depending on what has happened before, is a finite
state system.
Use Case Testing is defined as a software testing
technique, that helps identify test cases that cover the entire system, on a
transaction by transaction basis from start to the finishing point.
How to do Use Case
Testing: Example
In a use-case, an actor is represented by
"A" and system by "S". We create Use for a login
functionality of a Web Application as shown below
Main Success
Scenario
|
Step
|
Description
|
A:Actor
S:System |
1
|
A: Enter Agent Name
& Password
|
2
|
S: Validate Password
|
|
3
|
S: Allow Account Access
|
|
Extensions
|
2a
|
Password not valid
S: Display Message and ask for re-try 4 times |
2b
|
Password not valid 4
times
S: Close Application |
- Consider
the first step of an end to end scenario for a login functionality for our
web application where the Actor enters email and password.
- In the
next step, the system will validate the password
- Next,
if the password is correct, the access will be granted
- There
can be an extension of this use case. In case password is not valid system
will display a message and ask for re-try four times
- If
Password, not valid four times system will ban the IP address.
Here we will test the success scenario and one case of
each extension.
Testing Review:
A review in a Static Testing is a process or meeting
conducted to find the potential defects in the design of any program. Another
significance of review is that all the team members get to know about the
progress of the project and sometimes the diversity of thoughts may result in
excellent suggestions. Documents are directly examined by people and
discrepancies are sorted out.
Reviews can further be classified into four parts:
- Informal
reviews
- Walkthroughs
- Technical
review
- Inspections
Checklist-based Testing:
Checklist-based testing is used by
most of the experienced testers who are using checklists to guide their
testing. The checklist is basically a high-level list, or a reminder list, of
areas to be tested. This may include items to be checked, lists of rules, or
particular criteria or data conditions to be verified. Checklists are usually
developed over time and draw on the experience of the tester as well as on
standards, previous trouble-areas, and known usage scenarios. Coverage is
determined by the completion of the checklist.
Test Management & Control(Agile
Testing):
Estimation:
Test Estimation is a
management activity which approximates how long a
Task would take to complete. Estimating effort for the test is one of the major and important tasks
in Test Management.
Test Plan:
A TEST
PLAN is a document describing software testing scope and
activities. It is the basis for formally testing any software/product in a
project.
Test Plan Types
One can have the
following types of test plans:
- Master Test Plan: A single high-level test plan for a
project/product that unifies all other test plans.
- Testing Level Specific Test
Plans:Plans for each level of
testing.
- Unit Test Plan
- Integration Test Plan
- System Test Plan
- Acceptance Test Plan
- Testing Type Specific Test
Plans: Plans for major types of
testing like Performance Test Plan and Security Test Plan.
Test Plan Template
The format and content
of a software test plan vary depending on the processes, standards, and test
management tools being implemented. Nevertheless, the following format, which
is based on IEEE standard for software test documentation, provides a summary
of what a test plan can/should contain.
Test Plan Identifier:
- Provide a unique identifier for
the document. (Adhere to the Configuration Management System if you have
one.)
Introduction:
- Provide an overview of the test
plan.
- Specify the goals/objectives.
- Specify any constraints.
References:
- List the related documents,
with links to them if available, including the following:
- Project Plan
- Configuration Management Plan
Test Items:
- List the test items (software/products)
and their versions.
Features to be Tested:
- List the features of the
software/product to be tested.
- Provide references to the
Requirements and/or Design specifications of the features to be tested
Features Not to Be
Tested:
- List the features of the
software/product which will not be tested.
- Specify the reasons these
features won’t be tested.
Approach:
- Mention the overall approach to
testing.
- Specify the testing levels [if
it’s a Master Test Plan], the testing types, and the testing methods
[Manual/Automated; White Box/Black Box/Gray Box]
Item Pass/Fail
Criteria:
- Specify the criteria that will
be used to determine whether each test item (software/product) has passed
or failed testing.
Suspension Criteria
and Resumption Requirements:
- Specify criteria to be used to
suspend the testing activity.
- Specify testing activities
which must be redone when testing is resumed.
Test Deliverables:
- List test deliverables, and
links to them if available, including the following:
- Test Plan (this document itself)
- Test Cases
- Test Scripts
- Defect/Enhancement Logs
- Test Reports
Test Environment:
- Specify the properties of test
environment: hardware, software, network etc.
- List any testing or related
tools.
Estimate:
- Provide a summary of test
estimates (cost or effort) and/or provide a link to the detailed
estimation.
Schedule:
- Provide a summary of the
schedule, specifying key test milestones, and/or provide a link to the
detailed schedule.
Staffing and Training
Needs:
- Specify staffing needs by role
and required skills.
- Identify training that is
necessary to provide those skills, if not already acquired.
Responsibilities:
- List the responsibilities of
each team/role/individual.
Risks:
- List the risks that have been
identified.
- Specify the mitigation plan and
the contingency plan for each risk.
Assumptions and
Dependencies:
- List the assumptions that have
been made during the preparation of this plan.
- List the dependencies.
Approvals:
- Specify the names and roles of
all persons who must approve the plan.
- Provide space for signatures
and dates. (If the document is to be printed.)
Test Plan Guidelines
- Make the plan concise. Avoid
redundancy and superfluousness. If you think you do not need a section
that has been mentioned in the template above, go ahead and delete that section
in your test plan.
- Be specific. For example, when
you specify an operating system as a property of a test environment,
mention the OS Edition/Version as well, not just the OS Name.
- Make use of lists and tables
wherever possible. Avoid lengthy paragraphs.
- Have the test plan reviewed a
number of times prior to baselining it or sending it for approval. The
quality of your test plan speaks volumes about the quality of the testing
you or your team is going to perform.
- Update the plan as and when
necessary. An out-dated and unused document stinks and is worse than not
having the document in the first place.
Defects:
A
Software DEFECT / BUG is
a condition in a software product which does not meet a software requirement
(as stated in the requirement specifications) or end-user expectation (which
may not be specified but is reasonable). In other words, a defect is an error
in coding or logic that causes a program to malfunction or to produce
incorrect/unexpected results.
Defect Life Cycle:
Defect Life Cycle or Bug Life Cycle is the specific set of states
that a Bug goes through from discovery to defect fixation.


- Verified: The tester re-tests the bug after it got fixed by the
developer. If there is no bug detected in the software, then the bug is
fixed and the status assigned is "verified."
- Reopen: If the bug persists even after the developer has
fixed the bug, the tester changes the status to "reopened". Once
again the bug goes through the life cycle.
- Closed: If the bug is no longer exists then tester assigns
the status "Closed."
- Duplicate: If the defect is repeated twice or the defect
corresponds to the same concept of the bug, the status is changed to
"duplicate."
- Rejected: If the developer feels the defect is not a genuine
defect then it changes the defect to "rejected."
- Deferred: If the present bug is not of a prime priority and if
it is expected to get fixed in the next release, then status
"Deferred" is assigned to such bugs
- Not a bug:If it does not affect the functionality of the
application then the status assigned to a bug is "Not a bug".
Requirements Module:
- Defining the Requirements is
one of the preliminary phases for software development lifecycle.
- Defining Requirements refers to
what has to be delivered to the clients at the end of that specific
release.
- Establishing requirements with
brevity and clarity upfront would result in minimal rework after
development is completed.
- This module in ALM enables
users to define, manage and track requirements.
Test Plan
Module:
- After
defining requirements, development team kick starts their design and
development process while Testing team start designing
tests that can be executed once the build is deployed.
- Success
of any product depends on the testing processes and the quality of testing
that is being carried out. A GoodTest
Plan results in a bug free product.
- ALM
supports maintenance and execution of manual, automation and performance
tests as ALM is seamlessly integrated with all HP products such as HP UFT
and HP Load Runner.

Everybody knows that
testing is a process that produces and consumes large amounts of data. Data
used in testing describes the initial conditions for a test and represents the
medium through which the tester influences the software. It is a crucial part
of most Functional Testing.
But what actually is the test data? Why is it used? Maybe you would wonder
‘Designing Test cases is challenging enough, then why to bother about something
as trivial as Test Data’ The purpose of this tutorial is to introduce you to
Test Data, its importance and give practical tips and tricks to generate test
data quickly. So, Let's Begin!
What is Test Data? Why is
it Important?
Test data is actually
the input given to a software program. It represents data that affects or is
affected by the execution of the specific module. Some data may be used for
positive testing, typically to verify that a given set of input to a given
function produces an expected result. Other data may be used for negative
testing to test the ability of the program to handle unusual, extreme,
exceptional, or unexpected input. Poorly designed testing data may not test all
possible test scenarios which will hamper the quality of the software.
What is Test Data
Generation? Why test data should be created before test
execution?
Depending on your
testing environment you may need to CREATE Test Data (Most of the times) or at
least identify a suitable test data for your test cases (is the test data is
already created).
Typically test data is
created in-sync with the test case it is intended to be used for.
Test Data can be
Generated -
- Manually
- Mass
copy of data from production to testing environment
- Mass
copy of test data from legacy client systems
- Automated
Test Data Generation Tools
Typically sample data
should be generated before you begin test execution because it is difficult to
handle test data management otherwise. Since in many testing
environments creating test data takes many pre-steps or test environment
configurations which is very time-consuming. Also If test data
generation is done while you are in test
execution phase you may exceed your testing deadline.
Below are described
several testing types together with some suggestions regarding their testing
data needs.
Test Data for White Box
Testing
In White Box
Testing, test data Management is derived
from direct examination of the code to be tested. Test data may be selected by taking
into account the following things:
- It
is desirable to cover as many branches as possible; testing data can be
generated such that all branches in the program source code are tested at
least once
- Path
testing: all paths in the program source code are tested at least once -
test data preparation can done to cover as many cases as possible
- Negative API
Testing:
- Testing
data may contain invalid parameter types used to call different methods
- Testing
data may consist in invalid combinations of arguments which are used to
call the program's methods
Test Data for Performance
Testing
Performance
Testing is the type of testing
which is performed in order to determine how fast system responds under a
particular workload. The goal of this type of testing is not to find bugs, but
to eliminate bottlenecks. An important aspect of Performance Testing is
that the set of sample data used must be very close to 'real'
or 'live' data which is used on production. The following
question arises: ‘Ok, it’s good to test with real data, but how do I obtain
this data?’ The answer is pretty straightforward: from the people who know the
best – the customers. They may be able to provide some
data they already have or, if they don’t have an existing set of data, they may
help you by giving feedback regarding how the real-world data might look like.
In case you are in a maintenance testing project you
could copy data from the production environment into the testing bed. It is a
good practice to anonymize (scramble) sensitive
customer data like Social Security Number, Credit Card Numbers, Bank Details
etc. while the copy is made.
Test Data for Security
Testing
Security Testing is
the process that determines if an information system protects data from
malicious intent. The set of data that need to be designed in order to fully
test a software security must cover the following topics:
- Confidentiality: All
the information provided by clients is held in the strictest confidence
and is not shared with any outside parties. As a short example, if an
application uses SSL, you can design a set of test data which verifies
that the encryption is done correctly.
- Integrity: Determine
that the information provided by the system is correct. To design suitable
test data you can start by taking an in-depth look at the design, code,
databases and file structures.
- Authentication: Represents
the process of establishing the identity of a user. Testing data can be
designed as a different combination of usernames and passwords and its
purpose is to check that only the authorized people are able to access the
software system.
- Authorization: Tells
what are the rights of a specific user. Testing data may contain a
different combination of users, roles and operations in
order to check only users with sufficient privileges are able to perform a
particular operation.
Test Data for Black Box
Testing
In Black Box Testing
the code is not visible to the tester. Your functional test cases can have test
data meeting following criteria -
- No data: Check
system response when no data is submitted
- Valid data: Check
system response when Valid test data is submitted
- Invalid data: Check
system response when InValid test data is submitted
- Illegal data
format:
Check system response when test data is in an invalid format
- Boundary
Condition Dataset: Test data meeting boundary value conditions
- Equivalence
Partition Data Set: Test data qualifying your
equivalence partitions.
- Decision Table
Data Set:
Test data qualifying your decision table testing strategy
- State Transition
Test Data Set: Test data meeting your state transition
testing strategy
- Use Case Test
Data:
Test Data in-sync with your use cases.
Test Case Design:
A TEST CASE is
a set of conditions or variables under which a tester will determine whether a
system under test satisfies requirements or works correctly.
The process of
developing test cases can also help find problems in the requirements or design
of an application.
Test Case Template
A test case can have
the following elements. Note, however, that a test management tool is normally
used by companies and the format is determined by the tool used.
Test Suite ID
|
The ID of the test suite to which this test
case belongs.
|
Test Case ID
|
The ID of the test case.
|
Test Case Summary
|
The summary / objective of the test case.
|
Related Requirement
|
The ID of the requirement this test case relates/traces
to.
|
Prerequisites
|
Any prerequisites or preconditions that must
be fulfilled prior to executing the test.
|
Test Procedure
|
Step-by-step procedure to execute the test.
|
Test Data
|
The test data, or links to the test data,
that are to be used while conducting the test.
|
Expected Result
|
The expected result of the test.
|
Actual Result
|
The actual result of the test; to be filled
after executing the test.
|
Status
|
Pass or Fail. Other statuses can be ‘Not
Executed’ if testing is not performed and ‘Blocked’ if testing is blocked.
|
Remarks
|
Any comments on the test case or test
execution.
|
Created By
|
The name of the author of the test case.
|
Date of Creation
|
The date of creation of the test case.
|
Executed By
|
The name of the person who executed the
test.
|
Date of Execution
|
The date of execution of the test.
|
Test Environment
|
The environment (Hardware/Software/Network)
in which the test was executed.
|
Security
testing
What is Security Testing?
Security Testing is
defined as a type of Software Testing that ensures software systems and
applications are free from any vulnerabilities, threats, risks that may cause a
big loss. Security testing of any system is about finding all possible
loopholes and weaknesses of the system which might result into a loss of
information, revenue, repute at the hands of the employees or outsiders of the
Organization.
The goal of security
testing is to identify the threats in the system and measure its potential
vulnerabilities, so the system does not stop functioning or is exploited. It
also helps in detecting all possible security risks in the system and help
developers in fixing these problems through coding.
Types of Security Testing:


There are seven main
types of security testing as per Open Source Security Testing methodology
manual. They are explained as follows:
- Vulnerability
Scanning:
This is done through automated software to scan a system against known
vulnerability signatures.
- Security
Scanning: It
involves identifying network and system weaknesses, and later provides
solutions for reducing these risks. This scanning can be performed for
both Manual and Automated scanning.
- Penetration
testing:
This kind of testing simulates an attack from a malicious hacker. This
testing involves analysis of a particular system to check for potential
vulnerabilities to an external hacking attempt.
- Risk Assessment: This
testing involves analysis of security risks observed in the organization.
Risks are classified as Low, Medium and High. This testing
recommends controls and measures to reduce the risk.
- Security
Auditing: This
is an internal inspection of Applications and Operating systems for
security flaws. An audit can also be done via line by line inspection of
code
- Ethical hacking: It's
hacking an Organization Software systems. Unlike malicious hackers, who
steal for their own gains, the intent is to expose security flaws in the
system.
- Posture
Assessment: This
combines Security scanning, Ethical
Hacking and Risk Assessments to show an overall
security posture of an organization.
How to do Security Testing:
It is always agreed,
that cost will be more if we postpone security testing after software implementation
phase or after deployment. So, it is necessary to involve security testing in
the SDLC life cycle in the earlier phases.
Let's look into the
corresponding Security processes to be adopted for every phase in SDLC


SDLC Phases
|
Security Processes
|
Requirements
|
Security analysis for
requirements and check abuse/misuse cases
|
Design
|
|
Coding and Unit Testing
|
|
Integration Testing
|
|
System Testing
|
Black Box Testing and
Vulnerability scanning
|
Implementation
|
Penetration
Testing, Vulnerability Scanning
|
Support
|
Impact analysis of
Patches
|
The test plan should
include
- Security-related
test cases or scenarios
- Test
Data related to security testing
- Test
Tools required for security testing
- Analysis
of various tests outputs from different security tools
Security Testing Roles:
- Hackers - Access computer
system or network without authorization
- Crackers - Break into the
systems to steal or destroy data
- Ethical Hacker - Performs most
of the breaking activities but with permission from the owner
- Script Kiddies or packet
monkeys - Inexperienced Hackers with programming language skill.
What is Penetration Testing:
Penetration Testing is
defined as a type of Security Testing used
to test the insecure areas of the system or application. The goal of this
testing is to find all the security vulnerabilities that are present in the
system being tested. Vulnerability is the risk that an attacker can disrupt or
gain authorized access to the system or any data contained within it. It is
also called pen testing or pen test.
Vulnerabilities are
usually introduced by accident during software development and implementation
phase. Common vulnerabilities include design errors, configuration errors,
software bugs etc. Penetration Analysis depends upon two mechanisms namely
Vulnerability Assessment and Penetration Testing(VAPT).
Why Penetration Testing?
Penetration
is essential in an enterprise because -
- Financial sectors like Banks,
Investment Banking, Stock Trading Exchanges want their data to be secured,
and penetration testing is essential to ensure security
- In case if the software system
is already hacked and the organization wants to determine whether any
threats are still present in the system to avoid future hacks.
- Proactive Penetration Testing
is the best safeguard against hackers.
Types of Penetration Testing:
The type of penetration
test selected usually depends on the scope and whether the organization wants
to simulate an attack by an employee, Network Admin (Internal Sources) or by
External Sources. There are three types of Penetration testing and they are
- Black
Box Testing
- White
Box Penetration testing
- Grey
Box Penetration Testing
In black-box
penetration testing, a tester has no knowledge about the systems to be tested.
He is responsible to collect information about the target network or system.
In a white-box
penetration testing, the tester is usually provided with complete information
about the network or systems to be tested including the IP address schema,
source code, OS details, etc. This can be considered as a simulation of an
attack by any Internal sources (Employees of an Organization).
In a grey box
penetration testing, a tester is provided with partial knowledge of the system.
It can be considered as an attack by an external hacker who had gained
illegitimate access to an organization's network infrastructure documents.
How to do Penetration Testing:


Following
are activities needs to be performed to execute Penetration Test -
Step 1) Planning phase
- Scope & Strategy of
the assignment is determined
- Existing security policies,
standards are used for defining the scope
Step 2) Discovery phase
- Collect as much information as
possible about the system including data in the system, usernames and even
passwords. This is also called as FINGERPRINTING
- Scan and Probe into the ports
- Check for vulnerabilities of
the system
Step 3) Attack Phase
- Find exploits for various
vulnerabilities You need necessary security Privileges to exploit the
system
Step 4) Reporting Phase
- A report must contain detailed
findings
- Risks of vulnerabilities found
and their Impact on business
- Recommendations and solutions,
if any
The
prime task in penetration testing is to gather system information. There are
two ways to gather information -
- 'One to one' or 'one to many'
model with respect to host: A tester performs techniques in a linear way
against either one target host or a logical grouping of target hosts (e.g.
a subnet).
- 'Many to one' or 'many to many'
model: The tester utilizes multiple hosts to execute information gathering
techniques in a random, rate-limited, and in non-linear.
Examples of Penetration Testing Tools:
There is a wide variety
of tools that are used in penetration testing and the important tools are:
- NMap- This tool
is used to do port scanning, OS identification, Trace the route and for
Vulnerability scanning.
- Nessus- This is
traditional network-based vulnerabilities tool.
- Pass-The-Hash
- This tool is mainly used for password cracking.
Performance
testing
What
is Performance Testing?
Performance
Testing is defined as a type of software testing to ensure software
applications will perform well under their expected workload.
Features
and Functionality supported by a software system is not the only concern. A
software application's performance like its response time, reliability,
resource usage and scalability do matter. The goal of Performance Testing is
not to find bugs but to eliminate performance bottlenecks.
The
focus of Performance Testing is checking a software program's
- Speed - Determines whether the
application responds quickly
- Scalability - Determines
maximum user load the software application can handle.
- Stability - Determines if the
application is stable under varying loads
Performance
Testing is popularly called “Perf Testing” and is a subset of performance
engineering.
Why do
Performance Testing?

Performance Testing is
done to provide stakeholders with information about their application regarding
speed, stability, and scalability. More importantly, Performance Testing
uncovers what needs to be improved before the product goes to market. Without
Performance Testing, software is likely to suffer from issues such as: running
slow while several users use it simultaneously, inconsistencies across
different operating systems and poor usability.
Performance testing
will determine whether their software meets speed, scalability and stability requirements
under expected workloads. Applications sent to market with poor performance
metrics due to nonexistent or poor performance testing are likely to gain a bad
reputation and fail to meet expected sales goals.
Also, mission-critical
applications like space launch programs or life-saving medical equipment should
be performance tested to ensure that they run for a long period without
deviations.
According to Dunn &
Bradstreet, 59% of Fortune 500 companies experience an estimated 1.6 hours of
downtime every week. Considering the average Fortune 500 company with a minimum
of 10,000 employees is paying $56 per hour, the labor part of downtime costs
for such an organization would be $896,000 weekly, translating into more than
$46 million per year.
Only a 5-minute
downtime of Google.com (19-Aug-13) is estimated to cost the search giant as
much as $545,000.
It's estimated that
companies lost sales worth $1100 per second due to a recent Amazon Web Service
Outage.
Hence, performance
testing is important.
Types
of Performance Testing:
- Load testing - checks the application's ability to perform under
anticipated user loads. The objective is to identify performance
bottlenecks before the software application goes live.
- Stress testing - involves testing an application under extreme
workloads to see how it handles high traffic or data processing. The
objective is to identify the breaking point of an application.
- Endurance testing - is done to make sure the software can handle the
expected load over a long period of time.
- Spike testing - tests the software's reaction to sudden large
spikes in the load generated by users.
- Volume testing - Under Volume Testing large no. of. Data is
populated in a database and the overall software system's behavior is
monitored. The objective is to check software application's performance
under varying database volumes.
- Scalability testing - The objective of scalability testing is to determine
the software application's effectiveness in "scaling up" to
support an increase in user load. It helps plan capacity addition to your
software system.
Common
Performance Problems:
Most performance
problems revolve around speed, response time, load time and poor scalability.
Speed is often one of the most important attributes of an application. A slow
running application will lose potential users. Performance testing is done to
make sure an app runs fast enough to keep a user's attention and interest. Take
a look at the following list of common performance problems and notice how
speed is a common factor in many of them:
- Long Load time - Load
time is normally the initial time it takes an application to start. This
should generally be kept to a minimum. While some applications are
impossible to make load in under a minute, Load time should be kept under
a few seconds if possible.
- Poor response
time - Response
time is the time it takes from when a user inputs data into the
application until the application outputs a response to that input.
Generally, this should be very quick. Again if a user has to wait too
long, they lose interest.
- Poor scalability
- A
software product suffers from poor scalability when it cannot handle the
expected number of users or when it does not accommodate a wide enough
range of users. Load
Testing should
be done to be certain the application can handle the anticipated number of
users.
- Bottlenecking - Bottlenecks
are obstructions in a system which degrade overall system performance.
Bottlenecking is when either coding errors or hardware issues cause a
decrease of throughput under certain loads. Bottlenecking is often caused
by one faulty section of code. The key to fixing a bottlenecking issue is
to find the section of code that is causing the slowdown and try to fix it
there. Bottlenecking is generally fixed by either fixing poor running
processes or adding additional Hardware. Some common
performance bottlenecks are
- CPU
utilization
- Memory
utilization
- Network
utilization
- Operating
System limitations
- Disk
usage
Performance
Testing Process:
The
methodology adopted for performance testing can vary widely but the objective
for performance tests remain the same. It can help demonstrate that your
software system meets certain pre-defined performance criteria. Or it can help
compare the performance of two software systems. It can also help identify
parts of your software system which degrade its performance.
Below
is a generic process on how to perform performance testing

- Identify your testing
environment - Know your physical test
environment, production environment and what testing tools are available.
Understand details of the hardware, software and network configurations
used during testing before you begin the testing process. It will help
testers create more efficient tests. It will also help identify
possible challenges that testers may encounter during the performance
testing procedures.
- Identify the performance
acceptance criteria - This
includes goals and constraints for throughput, response times and resource
allocation. It is also necessary to identify project success
criteria outside of these goals and constraints. Testers should be
empowered to set performance criteria and goals because often the project
specifications will not include a wide enough variety of performance
benchmarks. Sometimes there may be none at all. When possible finding a
similar application to compare to is a good way to set performance goals.
- Plan & design performance
tests - Determine how usage is
likely to vary amongst end users and identify key scenarios to test for
all possible use cases. It is necessary to simulate a variety of end
users, plan performance test data and outline what metrics will be
gathered.
- Configuring the test
environment - Prepare
the testing environment before execution. Also, arrange tools and other
resources.
- Implement test design - Create the performance tests according to your
test design.
- Run the tests - Execute and monitor the tests.
- Analyze, tune and retest - Consolidate, analyze and share test results.
Then fine tune and test again to see if there is an improvement or
decrease in performance. Since improvements generally grow smaller with
each retest, stop when bottlenecking is caused by the CPU. Then you may
have the consider option of increasing CPU power.
Performance
Testing Metrics: Parameters Monitored
The basic parameters
monitored during performance testing include:


- Processor Usage - an
amount of time processor spends executing non-idle threads.
- Memory use - amount
of physical memory available to processes on a computer.
- Disk time - amount of
time disk is busy executing a read or write request.
- Bandwidth - shows
the bits per second used by a network interface.
- Private bytes - number
of bytes a process has allocated that can't be shared amongst other processes.
These are used to measure memory leaks and usage.
- Committed memory
- amount
of virtual memory used.
- Memory
pages/second - number of pages written to or read from
the disk in order to resolve hard page faults. Hard page faults are when
code not from the current working set is called up from elsewhere and
retrieved from a disk.
- Page
faults/second - the overall rate in which fault pages are
processed by the processor. This again occurs when a process requires code
from outside its working set.
- CPU interrupts
per second - is the avg. number of hardware interrupts
a processor is receiving and processing each second.
- Disk queue length
- is
the avg. no. of read and write requests queued for the selected disk
during a sample interval.
- Network output
queue length - length of the output packet queue in
packets. Anything more than two means a delay and bottlenecking needs to
be stopped.
- Network bytes
total per second - rate which bytes are sent and
received on the interface including framing characters.
- Response time - time
from when a user enters a request until the first character of the
response is received.
- Throughput - rate
a computer or network receives requests per second.
- Amount of
connection pooling - the number of user requests
that are met by pooled connections. The more requests met by connections
in the pool, the better the performance will be.
- Maximum active
sessions - the
maximum number of sessions that can be active at once.
- Hit ratios - This
has to do with the number of SQL statements
that are handled by cached data instead of expensive I/O operations. This
is a good place to start for solving bottlenecking issues.
- Hits per second - the
no. of hits on a web server during each second of a load test.
- Rollback segment
- the
amount of data that can rollback at any point in time.
- Database locks - locking
of tables and databases needs to be monitored and carefully tuned.
- Top waits - are
monitored to determine what wait times can be cut down when dealing with
the how fast data is retrieved from memory
- Thread counts - An
applications health can be measured by the no. of threads that are running
and currently active.
- Garbage
collection - It has to do with returning unused memory
back to the system. Garbage collection needs to be monitored for
efficiency.
Example
Performance Test Cases:
- Verify response time is not
more than 4 secs when 1000 users access the website simultaneously.
- Verify response time of the
Application Under Load is within an acceptable range when the network
connectivity is slow
- Check the maximum number of
users that the application can handle before it crashes.
- Check database execution time
when 500 records are read/written simultaneously.
- Check CPU and memory usage of
the application and the database server under peak load conditions
- Verify response time of the
application under low, normal, moderate and heavy load conditions.
During
the actual performance test execution, vague terms like acceptable range, heavy
load, etc. are replaced by concrete numbers. Performance engineers set these
numbers as per business requirements, and the technical landscape of the
application.
Performance
Test Tools:
There are a wide
variety of performance testing tools available in the market. The tool you choose
for testing will depend on many factors such as types of the protocol
supported, license cost, hardware requirements, platform support etc. Below is
a list of popularly used testing tools.
- LoadNinja – is
revolutionizing the way we load test. This cloud-based load testing tool
empowers teams to record & instantly playback comprehensive load
tests, without complex dynamic correlation & run these load tests in
real browsers at scale. Teams are able to increase test coverage. &
cut load testing time by over 60%.
- NeoLoad - is the
performance testing platform designed for DevOps that seamlessly
integrates into your existing Continuous Delivery pipeline. With NeoLoad,
teams test 10x faster than with traditional tools to meet the new level of
requirements across the full Agile software development lifecycle - from
component to full system-wide load tests.
- HP
LoadRunner - is
the most popular performance testing tools on the market today. This tool
is capable of simulating hundreds of thousands of users, putting
applications under real-life loads to determine their behavior under
expected loads. Loadrunner features a
virtual user generator which simulates the actions of live human users.
- Jmeter - one
of the leading tools used for load testing of web and application servers.
Database
testing
Difference Between GUI and Database Testing:
Whereas Database Testing is more
of checking the schema, tables, triggers, etc. to verify data integrity and
consistency in database under test. Sometimes it also involves creating complex
queries to load/stress test the database and check its responsiveness.
Both the above mentioned testing
are done by mostly all the Software Testing Companies. However, below are some of the main differences in GUI
and Database testing approaches:

Types of Database
Testing:
The
3 types of Database Testing are
- Structural Testing
- Functional Testing
- Non-functional Testing
Schema Testing:
The
chief aspect of schema testing is to ensure that the schema mapping between the
front end and back end are similar. Thus, we may also refer to schema testing
as mapping testing.
Let
us discuss most important checkpoints for schema testing.
- Validation of the various
schema formats associated with the databases. Many times the mapping
format of the table may not be compatible with the mapping format present in
the user interface level of the application.
- There is the need for
verification in the case unmapped tables/views/columns.
- There is also a need to verify
whether heterogeneous databases in an environment are consistent with the
overall application mapping.
Let
us also look at some of the interesting tools for validating database schemas.
- DBUnit that is integrated with
Ant is a very suitable for mapping testing.
- SQL Server allows the testers
to be able to check and to query the schema of the database by writing
simple queries and not through code.
For
example, if the developers want to change a table structure or delete it, the
tester would want to ensure that all the Stored Procedures and Views that use
that table are compatible with the particular change. Another example could be
that if the testers want to check for schema changes between 2 databases, they
can do that by using simple queries.
Database table, column
testing:
Let
us look into various checks for database and column testing.
- Whether the mapping of the
database fields and columns in the back end is compatible with those
mappings in the front end.
- Validation of the length and
naming convention of the database fields and columns as specified by the
requirements.
- Validation of the presence of
any unused/unmapped database tables/columns.
- Validation of the compatibility
of the
·
data type
·
field lengths
of the backend database columns with that of those present in the front end of
the application.
- Whether the database fields
allow the user to provide desired user inputs as required by the business
requirement specification documents.
Keys
and indexes testing
Important
checks for keys and indexes -
- Check whether the required
·
Primary Key
·
Foreign Key
constraints have been created on the required tables.
- Check whether the references
for foreign keys are valid.
- Check whether the data type of
the primary key and the corresponding foreign keys are same in the two
tables.
- Check whether the required
naming conventions have been followed for all the keys and indexes.
- Check the size and length of
the required fields and indexes.
- Whether the required
·
Clustered indexes
·
Non Clustered indexes
have been created on the required tables as specified by the business
requirements.
Stored procedures testing:
The
list of the most important things which are to be validated for the stored
procedures.
- Whether the development team
did adopt the required
·
coding standard
conventions
·
exception and error
handling
for all the stored procedures for all the modules
for the application under test.
- Whether the development team
did cover all the conditions/loops by applying the required input data to
the application under test.
- Whether the development team
did properly apply the TRIM operations whenever data is fetched from the
required tables in the Database.
- Whether the manual execution of
the Stored Procedure provides the end user with the required result
- Whether the manual execution of
the Stored Procedure ensures the table fields are being updated as
required by the application under test.
- Whether the execution of the
Stored Procedures enables the implicit invoking of the required triggers.
- Validation of the presence of
any unused stored procedures.
- Validation forAllow Null
condition which can be done at the database level.
- Validation of the fact that all
the Stored Procedures and Functions have been successfully executed when
the Database under test is blank.
- Validation of the overall
integration of the stored procedure modules as per as the requirements of
the application under test.
Some
of the interesting tools for testing stored procedures are LINQ , SP Test tool
etc.
Trigger testing:
- Whether the required coding
conventions have been followed during the coding phase of the Triggers.
- Check whether the triggers
executed for the respective DML transactions have fulfilled the required
conditions.
- Whether the trigger updates the
data correctly once they have been executed.
- Validation of the required
Update/Insert/Delete triggers functionality in the realm of the
application under test.
Database server validations:

- Check the database server
configurations as specified by the business requirements.
- Check the authorization of the
required user to perform only those levels of actions which are required
by the application.
- Check that the database server
is able to cater to the needs of maximum allowed number of user
transactions as specified by the business requirement specifications.
Functional database testing:
The
Functional database testing as specified by the requirement specification needs
to ensure most of those transactions and operations as performed by the end
users are consistent with the requirement specifications.
Following
are the basic conditions which need to be observed for database validations.
- Whether the field is mandatory
while allowing NULL values on that field.
- Whether the length of each
field is of sufficient size?
- Whether all similar fields have
same names across tables?
- Whether there are any computed
fields present in the Database?
This
particular process is the validation of the field mappings from the end user
viewpoint. In this particular scenario the tester would perform an operation at
the data base level and then would navigate to the relevant user interface item
to observe and validate whether the proper field validations have been carried
out or not.
The
vice versa condition whereby first an operation is carried out by the tester at
the user interface and then the same is validated from the back end is also
considered to be a valid option.
Login and user security:
The
validations of the login and user security credentials need to take into
consideration the following things.
- Whether the application
prevents the user to proceed further in the application in case of a
·
invalid username but
valid password
·
valid username but
invalid password.
·
invalid username and
invalid password.
·
valid username and a
valid password.
- Whether the user is allowed to
perform only those specific operations which are specified by the business
requirements.
- Whether the data secured from
unauthorized access
- Whether there are different
user roles created with different permissions
- Whether all the users have
required levels of access on the specified Database as required by the
business specifications.
- Check that sensitive data like
passwords, credit card numbers are encrypted and not stored as plain text
in database. It is a good practice to ensure all accounts should have
passwords that are complex and not easily guessed.
Load testing:
The
purpose of any load test should be clearly understood and documented.
The
following types of configurations are a must for load testing.
- The most frequently used user
transactions have the potential to impact the performance of all of the
other transactions if they are not efficient.
- At least one non-editing user
transaction should be included in the final test suite, so that
performance of such transactions can be differentiated from other more
complex transactions.
- The more important transactions
that facilitate the core objectives of the system should be included, as
failure under load of these transactions has, by definition, the greatest
impact.
- At least one editable
transaction should be included so that performance of such transactions
can be differentiated from other transactions.
- The observation of the optimum
response time under huge number of virtual users for all the prospective
requirements.
- The observation of the
effective times for fetching of various records.
Important
load testing tools are load runner, win runner and JMeter.
Stress testing:
Stress
testing is also sometimes referred to as torturous testing as it stresses the
application under test with enormous loads of work such that the system fails
.This helps in identifying breakdown points of the system.
Important
stress testing tools are load runner, win runner and JMeter.
Most
common occurring issues during database testing
- Significant amount of overhead
could be involved in order to determine the state of the database
transactions.
- Solution: The overall process
planning and timing should be organized so that no time and cost based
issues appear.
- New test data have to be
designed after cleaning up of the old test data.
- Solution: A prior plan and
methodology for test data generation should be at hand.
- An SQL generator is required to
transform SQL validators in order to ensure the SQL queries are apt for
handling the required database test cases.
- Solution: Maintenance of the
SQL queries and their continuous updating is a significant part of the overall
testing process which should be part of the overall test strategy.
- The above mentioned
prerequisite ensure that the set-up of the database testing procedure
could be costly as well as time consuming.
- Solution: There should be a
fine balance between quality and overall project schedule duration.
Myths or Misconceptions related to
Database Testing:
1. Database Testing requires plenty of expertise
and it is a very tedious job
·
Reality: Effective and
efficient Database testing provides long-term functional stability to the
overall application thus it is necessary to put in hard work behind it.
- Database testing adds extra
work bottleneck
·
Reality: On the
contrary, database testing adds more value to the overall work by finding out
hidden issues and thus pro-actively helping to improve the overall application.
- Database testing slows down the
overall development process
·
Reality: Significant
amount of database testing helps in the overall improvement of quality for the
database application.
- Database testing could be
excessively costly
·
Reality: Any
expenditure on database testing is a long-term investment which leads to
long-term stability and robustness of the application. Thus expenditure on
database testing is necessary.
Best Practices:
- All data including the metadata
as well as the functional data needs to be validated according to their
mapping by the requirement specification documents.
- Verification of the test data
which has been created by / in consultation with the development team
needs to be validated.
- Validation of the output data
by using both manual as well as automation procedures.
- Deployment of various
techniques such as the cause effect graphing technique, equivalence
partitioning technique and boundary-value analysis technique for
generation of required test data conditions.
- The validation rules of
referential integrity for the required database tables also need to be
validated.
- The selection of default table
values for validation on database consistency is a very important concept
Whether the log events have been successfully added in the database for
all required login events
- Does scheduled jobs execute in
timely manner?
- Take timely backup of Database.
Api
testing
What is
API Testing
API Testing is entirely
different from GUI Testing and
mainly concentrates on the business logic layer of the software architecture.
This testing won't concentrate on the look and feel of an
application.
Instead of using
standard user inputs(keyboard) and outputs, in API Testing, you use software to
send calls to the API, get output, and note down the system's response.
API Testing requires an
application to interact with API. In order to test an API, you will need to
- Use
Testing Tool to drive the API
- Write
your own code to test the API
Set-up
of API Test environment
- API Testing is different than
other software testing types as GUI is not available, and yet you are
required to setup initial environment that invokes API with a required set
of parameters and then finally examines the test result.
- Hence, Setting up a testing
environment for API testing seems a little complex.
- Database and server should be
configured as per the application requirements.
- Once the installation is done,
the API Function should be called to check whether that API is working.
Types
of Output of an API
An output of API could
be
- Any
type of data
- Status
(say Pass or Fail)
- Call
another API function.
Let's look at an
example of each of the above Types
Any Type of Data
Example: There is an
API function which should add two integer numbers.
Long add(int a, int b)
The numbers have to be
given as input parameters. The output should be a summation of two integer
numbers. This output needs to be verified with an expected outcome.
Calling needs to be
done such as
add (1234, 5656)
Exceptions have to be
handled if the number is exceeding the integer limit.
Status (say Pass or Fail)
Consider the below API
function -
- Lock()
- Unlock()
- Delete()
They return any value
such as True (in case of success) or false (In case of error) as an output.
A more accurate Test
Case would be, can call the
functions in any of the scripts and later check for changes either in the
database or the Application GUI.
Calling of another API /
Event

In this case, we call one of the API function which in turn will call another function.
For example - First API
function can be used for deleting a specified record in the table and this
function, in turn, calls another function to REFRESH the database.
Test
Cases for API Testing
Test
cases of API testing are based on
- Return value based on input
condition: it is relatively easy to
test, as input can be defined and results can be authenticated
- Does not return anything: When there is no return value, a behavior of API on the
system to be checked
- Trigger some other
API/event/interrupt: If
an output of an API triggers some event or interrupt, then those events
and interrupt listeners should be tracked
- Update data structure: Updating data structure will have some outcome or
effect on the system, and that should be authenticated
- Modify certain resources: If API call modifies some resources then it should be
validated by accessing respective resources
Approach
of API Testing
Following
points helps the user to do API Testing approach:

- Understanding the functionality
of the API program and clearly define the scope of the program
- Apply testing techniques such
as equivalence classes, boundary value analysis, and error guessing and
write test cases for the API
- Input Parameters for the API
need to be planned and defined appropriately
- Execute the test cases and
compare expected and actual results.
Difference
between API testing and Unit testing
Unit Testing
|
API testing
|
|
|
|
|
|
|
|
|
|
|
|
|
|
|
What to
test for in API testing
API
testing should cover at least following testing methods apart from usual SDLC
process
- Discovery testing: The test group should manually execute the set of
calls documented in the API like verifying that a specific resource
exposed by the API can be listed, created and deleted as appropriate
- Usability testing: This testing verifies whether the API is functional and
user-friendly. And does API integrates well with another platform as well
- Security testing: This testing includes what type of authentication is
required and whether sensitive data is encrypted over HTTP or both
- Automated testing: API testing should culminate in the creation of a set
of scripts or a tool that can be used to execute the API regularly
- Documentation: The test team has to make sure that the documentation
is adequate and provides enough information to interact with the API.
Documentation should be a part of the final deliverable
Best
Practices of API Testing
- Test cases should be grouped by
test category
- On top of each test, you should
include the declarations of the APIs being called.
- Parameters selection should be
explicitly mentioned in the test case itself
- Prioritize API function calls
so that it will be easy for testers to test
- Each test case should be as
self-contained and independent from dependencies as possible
- Avoid "test chaining"
in your development
- Special care must be taken
while handling one-time call functions like - Delete, CloseWindow, etc...
- Call sequencing should be
performed and well planned
- To ensure complete test
coverage, create test cases for all possible input combinations of the
API.
Types
of Bugs that API Testing detects
- Fails to handle error
conditions gracefully
- Unused flags
- Missing or duplicate
functionality
- Reliability Issues. Difficulty
in connecting and getting a response from API.
- Security Issues
- Multi-threading issues
- Performance Issues. API
response time is very high.
- Improper errors/warning to a
caller
- Incorrect handling of valid
argument values
- Response Data is not structured
correctly (JSON or XML)
Tools
for API Testing
Since API and Unit
Testing both target source code,
tools/frameworks can be used for their automation.
- Parasoft SOAtest
- Runscope
- Postman
- Curl
- Cfix
- Check
- CTESK
- dotTEST
- Eclipse
SDK tool- Automated API testing
Challenges
of API Testing
Challenges
of API testing includes:
- Main challenges in Web API
testing is Parameter Combination, Parameter Selection, and Call
Sequencing
- There is no GUI available to
test the application which makes difficult to give input values
- Validating and Verifying the
output in a different system is little difficult for testers
- Parameters selection and
categorization is required to be known to the testers
- Exception handling
function needs to be tested
- Coding knowledge is necessary
for testers
SoapUI
vs Postman, Katalon Studio: A Review of Top 3 API Tools
The
interest in API testing has been tremendously increasing over the last five
years, according to Google Trends. This trend reflects the paradigm shift toward Web-based
and mobile applications and decoupling the backend services and frontend user
interfaces.
API
testing is a type of testing that involves verifying and validating APIs and
Web services. Unlike traditional testing which focuses on functionality on the
GUI interacted by end users, API testing checks APIs used by developers and
occurs at the middle layer of the software (e.g., headless or GUI-less
components, usually invisible to end-users). In a typical Web or mobile app,
Web APIs connect different components, especially between the view or user
interface layer and the Web server. This makes applying automation to API
testing an attractive choice in modern software testing. (Learn more API Testing Introduction)
To
implement API testing successfully, teams must have a good set of tools that
match specific requirements. However, this is a challenging task, according
to our survey of more
than 2,200 software professionals. Part of the problem is that a chosen tool
seems to be suitable at first; but troubles arrive when it is integrated with
the existing tools and processes in the long run.
To help
you decide which tools work best for your API automation tests, this article
presents a review and comparison of three popular tools for API testing:
SoapUI, Postman, and Katalon Studio. SoapUI and Postman specialize in API
testing while Katalon Studio provides a complete solution for API, Web, and
mobile app testing. (Learn more Top 5 Free API Testing
Tools)
1. SoapUI

SoapUI is widely cited as a top choice when it comes to API testing. It is a headless functional testing tool specifically designed for API testing. SoapUI supports both REST and SOAP services. API automation testers can either use open-source or pro versions. The pro edition has a user-friendly interface and several advanced features such as assertion wizard, form editor, and SQL query builder. SoapUI is a tool of ReadyAPI suite, offered by SmartBear.
The
tool provides many advanced features for API testing, including
- Generates
tests easily using drag and drop, point-and-click
- Powerful
data-driven testing with data from files and databases
- Scripts
can be reused easily
- Mocks
services with RESTful mocking
- Asynchronous
testing
SoapUI
is distributed as Open-source and Pro versions ($659/year
for medium and large teams).
2. Postman

Postman emerged as a popular automation tool for API testing after having only been known as a browser extension for API validation. Postman can be installed as a browser extension or a desktop application on Mac, Linux, and Windows. It is used not only by automation testers for API tests but also by developers for developing and validating APIs. It has evolved, in fact, as an environment Rto develop and test APIs. Some notable features include:
- A
comprehensive feature set for designing, debugging, testing, documenting,
and publishing APIs
- Supports
both automated and exploratory testing
- A
friendly and easy-to-use user interface
- Accepts
Swagger and RAML API formats
Postman
is affordable as the product is offered in three editions: Postman (free), Postman
Pro ($8/month), and Postman Enterprise ($21/month).
3. Katalon Studio

Katalon Studio is an integrated environment to generate and execute API, Web-based GUI, and mobile apps automation tests. It has a rich feature set for these types of testing and supports multiple platforms including Windows, Mac OS, and Linux. By integrating Selenium and Appium engines with all needed components, built-in keywords, and templates, Katalon Studio provides a unique environment for both testers and developers to perform API and Web automation tests. Some notable highlights of the tool:
- Handles
API, Web, and mobile tests across platforms
- Allows
testers and developers to collaborate and share test cases easily
- Hundreds
of built-in keywords for creating test cases
- Supports
AssertJ to create fluent assertions using the BDD style
- Seamless
integration with other ALM tools for CI/DevOps practices
Katalon
Studio is free of charge although
it is not open-source.
Dedicated
support services, for instance, troubleshooting and consulting services are
offered in forms of Business Support and
Enterprise Support.


Postman
API Testing with Postman
Being an Open Source
tool, Postman can be easily downloaded. Here are the steps to install:
Step 1) Go to https://www.getpostman.com/downloads/ and choose your desired platform among Mac, Windows
or Linux. Click Download.


Step 2) Your download is in progress message should now display on the Apps page. Once the download has completed, click on Run.
Step 3) Installation Starts

Step 4) In the next window, Signup for a Postman Account
NOTE: There are two
ways to sign up for a Postman account. One is to create an own Postman account,
and the other is to use a Google account. Though Postman allows users to use
the tool without logging in, signing up ensures that your collection is saved and
can be accessed for later use.


Step 5) Select the workspace tools you need and click Save My
Preferences


Step 6) You will see the Startup Screen


Postman Navigation
Create New Request in Postman
Post requests are
different from Get request as there is data manipulation with the user adding
data to the endpoint. Using the same data from the previous tutorial in Get
request, let's now add our own user.
Step 1) Click a new tab to create a new request.


Step 2) In the new tab
- Set
your HTTP request to POST.
- Input
the same link in request url: https://jsonplaceholder.typicode.com/users
- switch
to the Body tab

- Click
raw
- Select
JSON

Step 4) Copy and paste just one user result from the
previous get request like below. Ensure that the code has been copied correctly
with paired curly braces and brackets. Change id to 11 and name to any desired
name. You can also change other details like the address.
[
{
"id": 11,
"name": "Krishna Rungta",
"username": "Bret",
"email": "Sincere@april.biz",
"address": {
"street": "Kulas Light",
"suite": "Apt. 556",
"city": "Gwenborough",
"zipcode": "92998-3874",
"geo": {
"lat": "-37.3159",
"lng": "81.1496"
}
},
"phone": "1-770-736-8031 x56442",
"website": "hildegard.org",
"company": {
"name": "Romaguera-Crona",
"catchPhrase": "Multi-layered client-server neural-net",
"bs": "harness real-time e-markets"
}
}
]

*Note: Post request should have the correct format to ensure that requested data will be created. It is a good practice to use Get first to check the JSON format of the request. You can use tools like https://jsonformatter.curiousconcept.com/

Step 5) Next,
- Click
Send.
- Status:
201 Created should be displayed
- Posted
data are showing up in the body.

GET Request in Postman
Get requests are used
to retrieve information from the given URL. There will be no changes done to
the endpoint.
We will use the
following URL for all examples in this tutorial
https://jsonplaceholder.typicode.com/users
In the workspace
- Set
your HTTP request to GET.
- In
the request URL field, input link
- Click
Send
- You
will see 200 OK Message
- There
should be 10 user results in the body which indicates that your.

*Note: There may be cases that Get request may be
unsuccessful. It can be due to an invalid request URL or authentication is
needed.
Response in Postman
Request Parameters in Postman
Data Parameterization
is one of the most useful features of Postman. Instead of creating the same
requests with different data, you can use variables with parameters. These data
can be from a data file or an environment variable. Parameterization helps to
avoid repetition of the same tests and iterations can be used for automation
testing.
Parameters are created
through the use of double curly brackets: {{sample}}. Let's take a look at an
example of using parameters in our previous request:

Step 1)
- Set
your HTTP request to GET
- Input
this link: https://jsonplaceholder.typicode.com/users. Replace
the first part of the link with a parameter such as {{url}}. Request url
should now be {{url}}/users.
- Click
send.
There should be no
response since we have not set the source of our parameter.


Step 2) To use the parameter you need to set the environment
- Click
the eye icon
- Click
edit to set the variable to a global environment which can be used in all
collections.

- set
the name to the url which is https://jsonplaceholder.typicode.com
- click
Save.

Step 4) Click close if you see the next screen


Step 5) Go back to your Get request then click send. There should
now be results for your request.


*Note: Always ensure
that your parameters have a source such as an environment variable or data file
to avoid errors.
POST Request using Postman
Post requests are
different from Get request as there is data manipulation with the user adding
data to the endpoint. Using the same data from the previous tutorial in Get
request, let's now add our own user.
Step 1) Click a new tab to create a new request.


Step 2) In the new tab
- Set
your HTTP request to POST.
- Input
the same link in request url: https://jsonplaceholder.typicode.com/users
- switch
to the Body tab

Step 3) In Body,
- Click
raw
- Select
JSON

Step 4) Copy and paste just one user result from the
previous get request like below. Ensure that the code has been copied correctly
with paired curly braces and brackets. Change id to 11 and name to any desired
name. You can also change other details like the address.
[
{
"id": 11,
"name": "Krishna Rungta",
"username": "Bret",
"email": "Sincere@april.biz",
"address": {
"street": "Kulas Light",
"suite": "Apt. 556",
"city": "Gwenborough",
"zipcode": "92998-3874",
"geo": {
"lat": "-37.3159",
"lng": "81.1496"
}
},
"phone": "1-770-736-8031 x56442",
"website": "hildegard.org",
"company": {
"name": "Romaguera-Crona",
"catchPhrase": "Multi-layered client-server neural-net",
"bs": "harness real-time e-markets"
}
}
]

*Note: Post request should have the correct format to ensure that requested data will be created. It is a good practice to use Get first to check the JSON format of the request. You can use tools like https://jsonformatter.curiousconcept.com/

Step 5) Next,
- Click
Send.
- Status:
201 Created should be displayed
- Posted
data are showing up in the body.

Functional
testing unite testing
What is Unit Testing?
UNIT Testing is defined
as a type of software testing where individual units/ components of a software
are tested.
Unit Testing of
software applications is done during the development (coding) of an
application. The objective of Unit Testing is to isolate a section of code and
verify its correctness. In procedural programming, a unit may be an individual
function or procedure. Unit Testing is usually performed by the developer.
In SDLC, STLC, V Model,
Unit testing is first level of testing done before integration testing. Unit
testing is a WhiteBox testing technique that is usually performed by the
developer. Though, in a practical world due to time crunch or reluctance of
developers to tests, QA engineers also do unit testing.


Why Unit Testing?
Sometimes software developers
attempt to save time by doing minimal unit testing. This is a myth because
skipping on unit testing leads to higher Defect fixing
costs during System Testing, Integration
Testing and even Beta
Testing after the application is completed.
Proper unit testing done during the development stage saves both time and money
in the end. Here, are key reasons to perform unit testing.
- Unit
Tests fix bug early in development cycle and save costs.
- It
helps understand the developers the code base and enable them to make
changes quickly
- Good
unit tests serve as project documentation
- Unit
tests help with code re-use. Migrate both your code andyour
tests to your new project. Tweak the code till the tests run again.
How to do Unit Testing
Unit
Testing is of two types
- Manual
- Automated
Unit
testing is commonly automated but may still be performed manually. Software
Engineering does not favor one over the other but automation is preferred. A
manual approach to unit testing may employ a step-by-step instructional
document.
Under
the automated approach-
- A developer writes a section of
code in the application just to test the function. They would later
comment out and finally remove the test code when the application is
deployed.
- A developer could also isolate
the function to test it more rigorously. This is a more thorough unit
testing practice that involves copy and paste of code to its own testing
environment than its natural environment. Isolating the code helps
in revealing unnecessary dependencies between the code being tested and
other units or data spaces in the product. These dependencies can
then be eliminated.
- A coder generally uses a
UnitTest Framework to develop automated test cases. Using an automation
framework, the developer codes criteria into the test to verify the
correctness of the code. During execution of the test cases, the framework
logs failing test cases. Many frameworks will also automatically flag and
report, in summary, these failed test cases. Depending on the severity of
a failure, the framework may halt subsequent testing.
- The workflow of Unit Testing is
1) Create Test Cases 2) Review/Rework 3) Baseline 4) Execute Test Cases.
Unit Testing Techniques
Code
coverage techniques used in united testing are listed below:
- Statement Coverage
- Decision Coverage
- Branch Coverage
- Condition Coverage
- Finite State Machine Coverage
Unit Testing Tools
There are several
automated tools available to assist with unit testing. We will provide a few
examples below:
- Jtest: Parasoft
Jtest is an IDE plugin that leverages open-source frameworks (Junit,
Mockito, PowerMock, and Spring) with guided and easy one-click actions for
creating, scaling, and maintaining unit tests. By automating these
time-consuming aspects of unit testing, it frees the developer to focus on
business logic and create more meaningful test suites.
- Junit: Junit is
a free to use testing tool used for Java programming language. It
provides assertions to identify test method. This tool test data first and
then inserted in the piece of code.
- NUnit: NUnit is widely used
unit-testing framework use for all .net languages. It is an open
source tool which allows writing scripts manually. It supports data-driven
tests which can run in parallel.
- JMockit:
JMockit is open source Unit testing tool. It is a code coverage tool
with line and path metrics. It allows mocking API with recording and
verification syntax. This tool offers Line coverage, Path Coverage, and
Data Coverage.
- EMMA:
EMMA is an open-source toolkit for analyzing and reporting code written in
Java language. Emma support coverage types like method, line, basic block.
It is Java-based so it is without external library dependencies and can
access the source code.
- PHPUnit: PHPUnit is a unit testing tool
for PHP programmer. It takes small portions of code which is called units
and test each of them separately. The tool also allows developers to
use pre-define assertion methods to assert that a system behave in a
certain manner.
Those are just a few of
the available unit testing tools. There are lots more, especially for C
languages and Java, but you are sure to find a unit testing tool for your
programming needs regardless of the language you use.
Test Driven Development (TDD) & Unit Testing
Unit
testing in TDD involves an extensive use of testing frameworks. A unit test
framework is used in order to create automated unit tests. Unit testing
frameworks are not unique to TDD, but they are essential to it. Below we look
at some of what TDD brings to the world of unit testing:
- Tests are written before the
code
- Rely heavily on testing
frameworks
- All classes in the applications
are tested
- Quick and easy integration is
made possible
Unit Testing Myth
Myth: It requires time, and I am always overscheduled
My code is rock solid! I do not need unit tests.
My code is rock solid! I do not need unit tests.
Myths by their very
nature are false assumptions. These assumptions lead to a vicious cycle as
follows -


Truth is Unit testing
increase the speed of development.
Programmers think that
Integration Testing will catch all errors and do not execute the unit test.
Once units are integrated, very simple errors which could have very easily
found and fixed in unit tested take a very long time to be traced and fixed.
Unit Testing Advantage
- Developers looking to learn
what functionality is provided by a unit and how to use it can look at the
unit tests to gain a basic understanding of the unit API.
- Unit testing allows the
programmer to refactor code at a later date, and make sure the module
still works correctly (i.e. Regression testing). The procedure is to write
test cases for all functions and methods so that whenever a change causes
a fault, it can be quickly identified and fixed.
- Due to the modular nature of
the unit testing, we can test parts of the project without waiting for
others to be completed.
Unit Testing Disadvantages
- Unit testing can't be expected
to catch every error in a program. It is not possible to evaluate all
execution paths even in the most trivial programs
- Unit testing by its very nature
focuses on a unit of code. Hence it can't catch integration errors or
broad system level errors.
It's
recommended unit testing be used in conjunction with other testing activities.
Unit Testing Best Practices
- Unit
Test cases should be independent. In case of any enhancements or change in
requirements, unit test cases should not be affected.
- Test
only one code at a time.
- Follow
clear and consistent naming conventions for your unit tests
- In
case of a change in code in any module, ensure there is a corresponding
unit Test Case for the
module, and the module passes the tests before changing the implementation
- Bugs
identified during unit testing must be fixed before proceeding to the next
phase in SDLC
- Adopt
a "test as your code" approach. The more code you write without
testing, the more paths you have to check for errors.
Mobile
Apps Testing: Sample Test Cases & Test Scenarios
Functional Testing Test Cases
Performance Testing
Security Testing Test Cases
Usability Testing Test Cases
Compatibility Testing Test Cases
Recoverability Testing Test Cases
Important Checklist

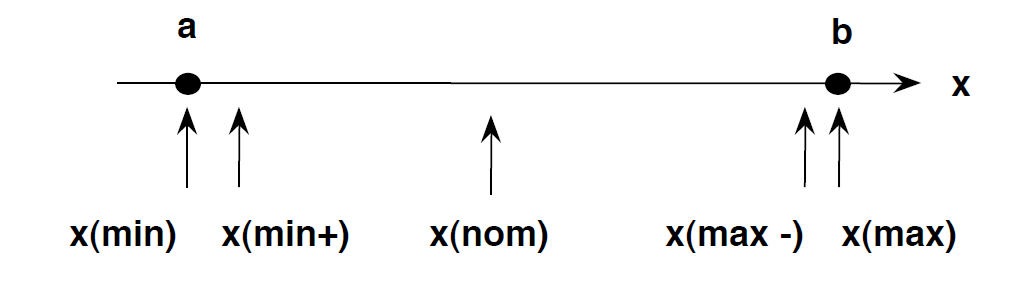
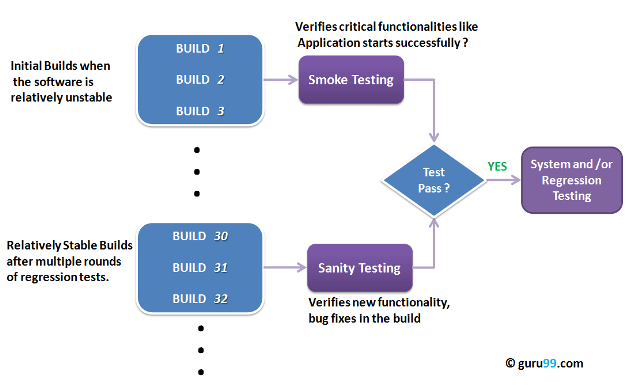
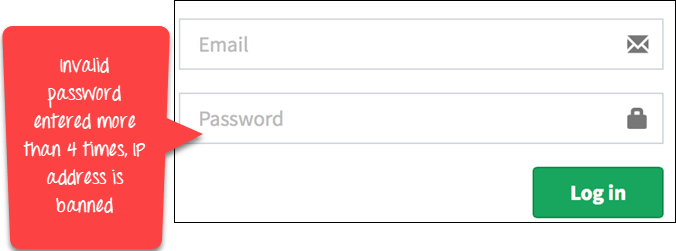
)
1 Comments
Excellent tips about software testing. Really useful stuff .Never had an idea about this, will look for more of such informative posts from your side...
ReplyDeleteSoftware Testing Services
Software Testing Company
Software Testing Companies in USA
QA Testing Companies
Software Testing Services in USA